Tuesday, October 4, 2011

Spicy Baked Pretzel Recipe

Yummy!  These are so yummy and so easy to make!!

Ingredients
  • 3/4 cup vegetable oil
  • 1 (1 ounce) package dry ranch salad dressing mix
  • 1 teaspoon garlic salt
  • 1 teaspoon ground cayenne pepper
  • 1 (15 ounce) package mini twist pretzels


Directions

  1. Preheat oven to 200 degrees F (95 degrees C).
  2. In a medium bowl, mix together vegetable oil, dry ranch dressing mix, garlic salt and cayenne pepper.
  3. Place pretzels in a medium baking dish. Coat with the vegetable oil mixture.
  4. Stirring occasionally, bake coated pretzels uncovered in the preheated oven 2 hours, or until toasted and crispy.  
Enjoy!

Saturday, October 1, 2011

Wild Thing I think I love you - no sew vest

This has got to be the most simple no sew project EVER!  I must give credit to the gal who came up this - I ran across it on Pinterest and remembered a piece of jersey I had picked up last year.  Honestly I picked up this fabric with the intention of sewing a vest with a pattern that very similar vest.  Then when I saw the Behind the Scenes blog post I knew what I had to do...

This was my fabric - I had bought 1.5 yards (to use with my pattern that still remains unused).  It is a jersey fabric so it lays nicely and doesn't fray or tear.

Since I had 1.5 yards and Behind the Scenes called for 1 yard I cut my fabric to 36 inches long but left the 54" width as is.  

I measured 6 in in from the top and 6 in in from the bottom (see my green mark).  Then I made a 6" long line and cut along it. To make it more of a hole than a slit I cut out about 1" wide slit to accommodate arm holes.
Since it was a little looooong to begin with (fell below my bottom) I used a yard stick to cut an angle from the outside points up to the middle 7".  I love how it drapes and flows!!

But I was left with a half yard of fabric - the dilema was what to do with it?  I thought about making a hair flower then I hit brilliance check out what I did below!

There was enough fabric if I cut the piece in half to make a mini-vest for mini-me!!  I used the same technique as before only on a smaller scale for my little one.  Then since I still had 1/2 of a 1/2 a yard left and the oldest (who generally begs for her picture not to be put online anywhere.... begged for one too).

Hers ended up being a mini-vest since I didn't have a ton of fabric left - honestly this fits her style much more than a long one would have anyways!!

Check us out!!  We're going to debut our new No Sew Fabric Vests tomorrow at church - YEAH!

Friday, September 30, 2011

Best Peanut Butter Cookie Recipe

I'm not sure where I found this recipe.  I'm sure it was online somewhere but my recipe says 'author unknown'...  

Peanut Butter Cookies

1/2 c Brown Sugar
1/2 c White Sugar
1 Egg
1/2 c Margarine (softened)
1 t Vanilla
1/2 c Peanut Butter (smooth)
1 1/2 c  Flour
1 t baking soda
1/2 t salt
1 C Reese's Pieces

Preheat over to 350 degrees - line baking pan with parchment paper.

In large bowl mix together until light and fluffy:
Brown Sugar
White Sugar
Margarine
Add in and mix until incorporated:
Egg
Vanilla
Slowly add in
Flour
Baking Soda
Salt
Stir in Reese's Pieces

Scoop onto parchment paper and press down slightly with a fork twice.  Bake 10-12 min. 

These are so good I have to freeze them before the family devours them or else they won't make it till this weekends 'Tween Spa Party'
 Even the batter is good!

Wednesday, September 28, 2011

Free Craft Class

SoulBridge Vineyard is hosting a totally FREE Crafting Class October 22nd 2011!!

Van Wert Ohio people - how would you like to attend a totally FREE craft class?  Freckles & Fun and Thrift Store Rock Star along with a couple creative friends are presenting some awesome crafts!  

This class is totally FREE of charge - make sure you RSVP to guarantee a spot.

We're making 4 different crafts, it's all hands on so you'll be making them too!  These 4 crafts are low cost, super easy and lots of fun. It's just in time for holiday gifting!

If you're interested - RSVP by emailing soulbridgevw@aol.com or calling 419-232-3400

Tuesday, September 27, 2011

Salted Caramel Milk Chocolate Cookies

I ran across this blog ' The Diary of Dave's Wife' this weekend and drooled over the cookies on this post.  They looked so good I just had to make them!  I found the caramel bits in our local Wal-Mart below the chocolate chips in the baking isle.

I'm generally not a sweets person so the salty pretzel part of the recipe is what appealed to me.

This is the slightly altered recipe I used:
3/4 c salted butter softened (I would us margarine next time, I'm not a fan of butter in cookies).
3/4 c brown sugar
3/4 c white sugar
1 egg
2 tsp vanilla (I use the real deal - I make it myself but that's another post)
2 c flour
1 tsp baking soda
1 c milk chocolate chips (I use Ghiradelli)
1 c caramel bits
1/2 c crushed pretzels

Preheat oven to 350
 
Cream together butter and sugars until light and fluffy. Beat in egg & vanilla. Beat in flour & soda. When all is incorporated, stir in chocolate chips (or chocolate pieces) caramels and pretzels.

Drop rounded tablespoons of dough 2 inches apart onto baking sheets covered in parchment paper. (the parchment is important some of mine had melted caramel on them, with the parchment it comes right off.)

Bake for 10 minutes for a chewy cookie. 

This recipe makes about 4 dozen cookies. 

I can honestly say these were SO good I had to get them out of the house asap or else I would have ate half of them!  My co-workers enjoyed them as did every member of my household.  They were gone so quick I didn't even get a chance to take a picture!

Monday, September 26, 2011

T-shirt Flower Headband

Super Simple Craft - T-shirt Flower Headband


What you'll need:
1 Headband
1 Tshirt
Needle & Thread
Scissors
Hot Glue Gun

I folded the t-shirt to create 4 layers of fabric.  Then I used a marker and traced 2 different sized circles a total of 3 times each.  Before I cut out the circles I stuck a straight in through all 4 layers to keep the fabric in place.  Next I cut slits around the circle to create 'petals' in each set of fabric circles.


Then I removed my pins and laid the smaller flower on top of the larger flower.

Now use your needle and thread to sew right in the middle of the flowers.  The tighter you pull the more the flower will bunch up.  You can also randomly stitch the center flower a little further out from the center to create more bunching and dimension in the flower.


Now you're ready to hot glue to the headband.  If you are using a thin headband I recommend using an extra small un-petaled circle to glue to the opposite side of the headband (using the headband in the middle of a flower/circle sandwich with glue).  Since my headband is wide I glued directly to the fabric flower.

Repeat the above steps to add as many flower as you would like on your headband.  I used 3, 1 larger and 2 smaller finished flower.
We think it turned out pretty cute!  Here is a link to the blog post that inspired this headband.  I've also made these necklaces & love them!!

The headband was made from a tie dye necklace - I love how it turned out!

Thursday, September 22, 2011

Distressing Furniture

Have you tried distressing furniture?  Making it look old or worn after spending time making it look brand new?  Sounds crazy - eh?  But its so much fun!  This is my very first time distressing a piece of furniture. 

We'll call him Blue Bonnet - he came from a garage sale my Mom's neighbor was having.  They told her she could have him for FREE (my favorite).  I really wish I would have caught a before picture but his transformation happened so quickly I forgot to take a pic.  Let me paint the picture of him... His back was black, his seat was white, and his legs were black - he was quite the site...

This color combo made a great distressing project!  Because even though I painted over him with a single color when I distressed him showed his old colors right through!  Check him out!
I used Rustoleum Gloss Blue paint to spray right over the current color scheme.  Then I tore off a finger size piece of sand paper.  I used it to rub over the legs and any or curve or edge.  I didn't run hard just enough to scratch off the blue.  Then use a clear glaze to seal the distressed edges (or you can use spray clear gloss to seal also).
What do you think of the close up?  Fun stuff!! 


Tuesday, September 20, 2011

Ah, Comfort Food - Bacon Cheddar Potato Chowder & Beer Bread

You know that warm and fuzzy feeling you get?  Ah, Comfort Food!
My oldest daughter requests this about once a week.. I think she would eat it every day if she could!

Bacon Cheddar Potato Chowder
6 cups milk
2 can (10-3/4 oz.) condensed cream of potato soup
4 cups frozen Southern-style hash browns
2 cup Shredded Sharp Cheddar Cheese
1 package Real Bacon Bits

Mix milk and soup in large saucepan. 
Stir in hash browns. 
Bring to boil on high heat, stirring occasionally; simmer on medium-low 10 min., stirring frequently.  
Add bacon bits & cheese - stir until cheese is melted.

 This is perfect with some Crusty Bread (we love beer bread) and you can make it without a mix!

Beer Bread
3 cups flour (sifted - yes you need to sift it) 
3 teaspoons baking powder
1 teaspoon salt
1/4 cup sugar 
1 (12 ounce) can beer 
1/4 cup melted butter or margarine  

Preheat oven to 375 degrees. 
Mix dry ingredients and beer.
Grease Loaf Pan and pour in batter (it may be lumpy)
Pour melted butter over mixture.
Bake 1 hour, remove from pan and cool for at least 15 minutes.

Beer Bread makes a great sandwich the next day too!  I love to fill it with some Farmers Cheese (if you didn't know Farmers Cheese is VERY low in lactose so if you suffer from lactose intolerance it's perfect!) and smoked turkey lunch meat.  I butter the bread & grill it up like a grilled cheese and dip it into some soup - YUMMY!

Saturday, September 17, 2011

We have a WINNER!!!

Thanks for all your support & 'likes'!!  

We have a winner!

Congratulations to Donna  from Sweetness, Sunshine and Mischief!!  You're treasure will be in the mail very soon!  Let me know where to mail the box of goodies to - you can private message me on Facebook.

Thanks to Random.org for choosing our random winner!!

Have a great weekend & stay tuned for next weeks posts!

Friday, September 16, 2011

I'm drawing tonight for the Give-a-Way!!

Remember a couple weeks ago when I promised a super awesome GIVE-A-WAY when we hit 50 'likes' on Facebook or Blogger?  
We're there!!! 
 
If you're already liked or follow TSRS you're already entered to win!  I'm drawing a name tonight Friday Sept 16th!!  

Want multiple chances to win?  One entry for each of the following:
1. 'like' Thrift Store Rock Star on Facebook
2. 'follow' this blog on blogger
3. comment on this post for a bonus entry by letting me know what your favorite past post has been or what you would like to see on this blog!


What are you waiting for?  You know you want to win something totally awesome!

Thursday, September 15, 2011

Homemade Dry Erase Board!

Picture Frame Transformation...
I want to introduce you to the 'Affirmation Board'.  I have to say I stole the 'Affirmation Board' idea from my friend Rachel who has one in their bedroom to write awesome things to her husband.  Check out one of her posts to her awesome husband Phil:
I started thinking about dry erase boards and how boring they are... Even the cute colored ones aren't too exciting...  After writing on our mirror one day it occurred to me that any picture frame could become a dry erase board!  

Plus how cute would it be with scrapbook paper behind the glass - or even better scrap fabric - the thought makes me smile!  I love picture frames that aren't the normal 8x10 or 5x7 shape - something odd or fun or different just appeals to me (I LUV round or oval frames not that they are very good for pictures but for this - PERFECT).

Today I found this long frame at Goodwill for 2.99 (more than I wanted to pay but still the shape was perfect for my space).
First I popped out the picture and glass.  I wiped off the frame and used window cleaner on both sides of the glass.  Since natural wood doesn't really work in our bedroom I used some spray primer & paint I had on  hand to give it a simple black make-over.
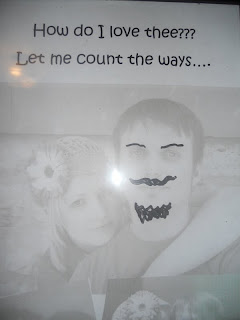
It also occurred to me that it would be MUCH more romantic to use our pictures than scrapbook paper or fabric ;-)  This was really simple - I inserted color pictures into a word document - I formatted the pics to the lightest gray I could (you could use a pink frame with pink washout pics or any combo).  Then I cut the pictures and laid them out over the backside of the ducks.  I used spray adhesive to attach the pictures to the cardboard.  (If you were using fabric I would wrap it over the back of the cardboard for a clean edge and tight fit.
After I had the pics adhered to the cardboard and the paint was dry on the frame I put the glass back and then the picture cardboard in.  Finally I needed a cute way to hang it and a way to attach the dry erase marker.  I used some left over ribbon and staple gun to attach the ribbon.
I used 2 staples on each corner of the ribbon hanger and 2 on the side where I attached the marker ribbon.  I hot glued the marker to the opposite end of the ribbon. Finally I hung the new 'Affirmation Board' aka Homemade Dry Erase Board transformation from a picture frame!
It says 'How do I love thee???  Let me count the ways...' 
Then I used 4 fun pics of us together.  

Now if I had used fabric or scrapbook paper I wouldn't be able to have as much fun doing this...
I did write a little love note to my wonderful husband (after I had fun drawing on our faces...)

This was such a great project I'm on my way out to my favorite 'cheap' thrift store tomorrow to see what I can find.  I think every bedroom in our house needs an Affirmation Board - its a simple way to remind each other and our kids how much we love and appreciate them.  

This is a great way to encourage a child each morning too!!  Of course you could personalize the inside to suit the child - sports, pets, fun colors, possibilities are endless!

Check out some of my others (for sale at ReHab Fab downtown Van Wert Ohio)

Black & Animal print
This is my favorite so far - thick frame with classic background
Little Girls Ballet Board
Perfect for a babies room.

Wednesday, September 14, 2011

Time for a GIVE-A-WAY

Remember a couple weeks ago when I promised a super awesome GIVE-A-WAY when we hit 50 'likes' on Facebook or Blogger?  
We're there!!! 
(In fact at this moment in time we're at 65 on Facebook & 21 on Blogger).  
 
If you're already liked or follow TSRS you're already entered to win!  I'm drawing a name Friday night Sept 16th so there is still time to 'like' or 'follow' and WIN!!  

Want multiple chances to win?  One entry for each of the following:
1. 'like' Thrift Store Rock Star on Facebook
2. 'follow' this blog on blogger
3. comment on this post for a bonus entry by letting me know what your favorite past post has been or what you would like to see on this blog!


What are you waiting for?  You know you want to win something totally awesome!

Tuesday, September 13, 2011

Tasty Tuesday!!

Tasty Tuesday - Family Recipe Time

This recipe goes back generations!  This recipe goes back beyond the days of having a fridge in your home...  Coconut Ice Box Cookies
(I rarely make these because honestly they rarely make it out of the 'ice box' to the oven - the dough is SO good)

Here is what you need (you could easily 1/2 this recipe):
1c Blue Bonnet
2C brown sugar
3 eggs
1.5t vanilla
(cream the 4 above ingredients in large mixing bowl)
.5t salt
2.5C flour
1.5t baking soda
(sift above 3 ingredients together in separate bowl)
3.5C Quick Oats
2C Coconut
1C chips (we like 1/2 c mini chocolate chips & 1/2 c butterscotch chips)
Mix flour mixture into creamed mixture - add in Oats, Coconut, Chips
(I will warn you this is a THICK dough - I've killed 2 mixers on this recipe.  My Kitchen Aid (which I personally think EVERY kitchen needs - its totally worth every penny!!) does fine, mixes with ease).
Lay out about 24" of wax paper on a table - spoon dough onto the paper.
Roll the paper over the dough and put in the 'ice box' until ready to bake (my recipe made 3 rolls of dough - depending how big you want your cookies.
When you are ready to bake cut the dough into slices and place on greased cookie sheet or parchment paper (one of my favorite things)
Bake - 375 for 10-12 min.
Then time to eat!  These also freeze great in a Tupperware for up to 3 months!

Monday, September 12, 2011

Dress Form Makeover

Dress Form Makeover

Do you have that one item that you always keep your eye out for when you're shopping?  I'm always looking for a dress form at auctions and thrift stores and garage sales.  It would make a great gift *hint*hint* or if you've got one laying around you'd like to recycle to me I'd be ever so delighted!

I'd love to have one to decorate with as well as be functional so I could 'play' with design and see it in 3D.

Until then... I was super excited to find this little lady at a Goodwill Store in Ft Wayne Indiana.  I highly recommend the Goodwill off Exit 25 on 469!!  It was super neat and clean and the employees were very friendly and happy to be working.

Here she is my $5 bargain!
We'll call her 'Goldie' - she doesn't look so good above...  She's a candle holder but I think she'll make a great place to hang some necklaces on too!!
Here is 'Goldie' in her own little black dress (aka Rustoleum Gloss Spray paint).  What a BIG difference a little spray paint can make!

I also found this awesome lamp there - I'm not sure what to do with it... It's one of those pieces that caught my eye right away but I left alone because I really didn't know what to do with it...  Either way $5 later he's mine - we'll call him 'Blue Bandit' since he stole me eye the first time I laid eyes on him...
Any idea what to do with him or where to put him? 

Don't forget to 'like' TSRS on Facebook or 'follow' TSRS on Blogger to win!!

Sunday, September 11, 2011

'Like' Thrift Store Rock Star on Facebook - GIVE A WAY

Come 'like' Thrift Store Rock Star on Facebook and keep up with every post the same day they go live!!  Or 'like' Thrift Store Rock Star and catch up on all the old posts you may have missed!
 

BONUS - When Thrift Store Rock Star reaches 50 'likes' on Facebook I'll do a random give-a-way to one of you followers/likers.  
So become a follower of this blog Thrift Store Rock Star or 'like' our Facebook Page to be able to win the totally free totally awesome give-a-way (when we hit 50 Blog Followers or 50 Facebook Likes)!  

If you do both you'll be entered in twice to the random draw!!


What are you waiting for?  You know you want to win something totally awesome!

Saturday, September 10, 2011

Weekend Craftyness

Ready for some more weekend craftiness?  
Check out this cute flower headband (and it's SO simple!)
All I used was 4 felt circles, fabric circles the same size as the felt circles, headband & glue gun.
First take one of the fabric circles and fold it in half 3 times.  Hot glue the tip of the flower and press onto the middle of the felt circle.
Continue to fold the fabric circles and hot glue the tips to the felt until you have filled the felt with the fabric 'petals'.
If the 'petals' appear a bit uneven they can be trimmed with fabric scissors.  The glue the two fabric circles together with the headband in between the felt circles.
I also used a 'pin' instead of a headband to create two more flowers
You should also run over and check out the inspiration for this flower.
Here is a little taste of a future post
Who doesn't love a little flower bling in the hair?  So Cute, So Easy, So Fun!

Don't forget to 'like' TSRS on Facebook or 'follow' TSRS on Blogger to win!!